Sunday, March 8, 2020

Weekend Vibes | Citrus Twist Kits


Hey friends!  I'm here with you today sharing this week's Sunday Sketch Challenge for Citrus Twist Kits.  My project came together so quickly using the sketch and the gorgeous Scrapbooking Add-on Kit and This Is Life "Weekend Life" Stamp!

Here's a look at the sketch:


Here's the layout I created:


For my project today, I chose to create a spread in my Life Crafted Album, instead of doing a traditional 12x12 or 8.5x11 page.  To begin, I trimmed some white cardstock to 5x8.25 inches to serve as base pages for my project.  Following the sketch, I trimmed two patterned papers to span across both sides of the album.  I typed my journaling on a piece of white cardstock and used the This Is Life "Weekend Life" Stamp to add a bit of stamping above and below the journaling. Next, I used the Magical Forest Copper Alphabet Stickers to add the word "good."  I used a black and white striped paper from this month's Life Crafted kit to add a hand-cut pennant banner above the journaling block.  This little detail was found in the sketch and I love the extra interest and texture it adds to the page!


For the other side of the layout, I fussy cut a large floral piece from a patterned paper in the Add-on kit.  Then, I layered my photo over a "remember" card I trimmed from a cut apart sheet in the kit.  To embellish, I added some gold polka dot washi tape, a puffy butterfly sticker, and an ephemera tab and label.


For the top portion of the spread, I followed the sketch and added a strip of patterned paper across the top of the layout.  I tucked another fussy cut floral behind the strip.


For the title, I stamped the word "weekend" using the Weekend Life stamp and black ink.  I used the copper alpha stickers to complete the title and added an ephemera tab to the edge of the page.  As a final finishing touch, I added some machine stitching to several areas of the layout.


Thank you for stopping by today!  I hope you will join in on this week's Sunday Sketch Challenge and share your project with us on the CTK Facebook Fan Page or on Instagram using #citrustwistkits.  I will see you again soon!

xo,


Monday, March 2, 2020

Hello Life | Citrus Twist Kits


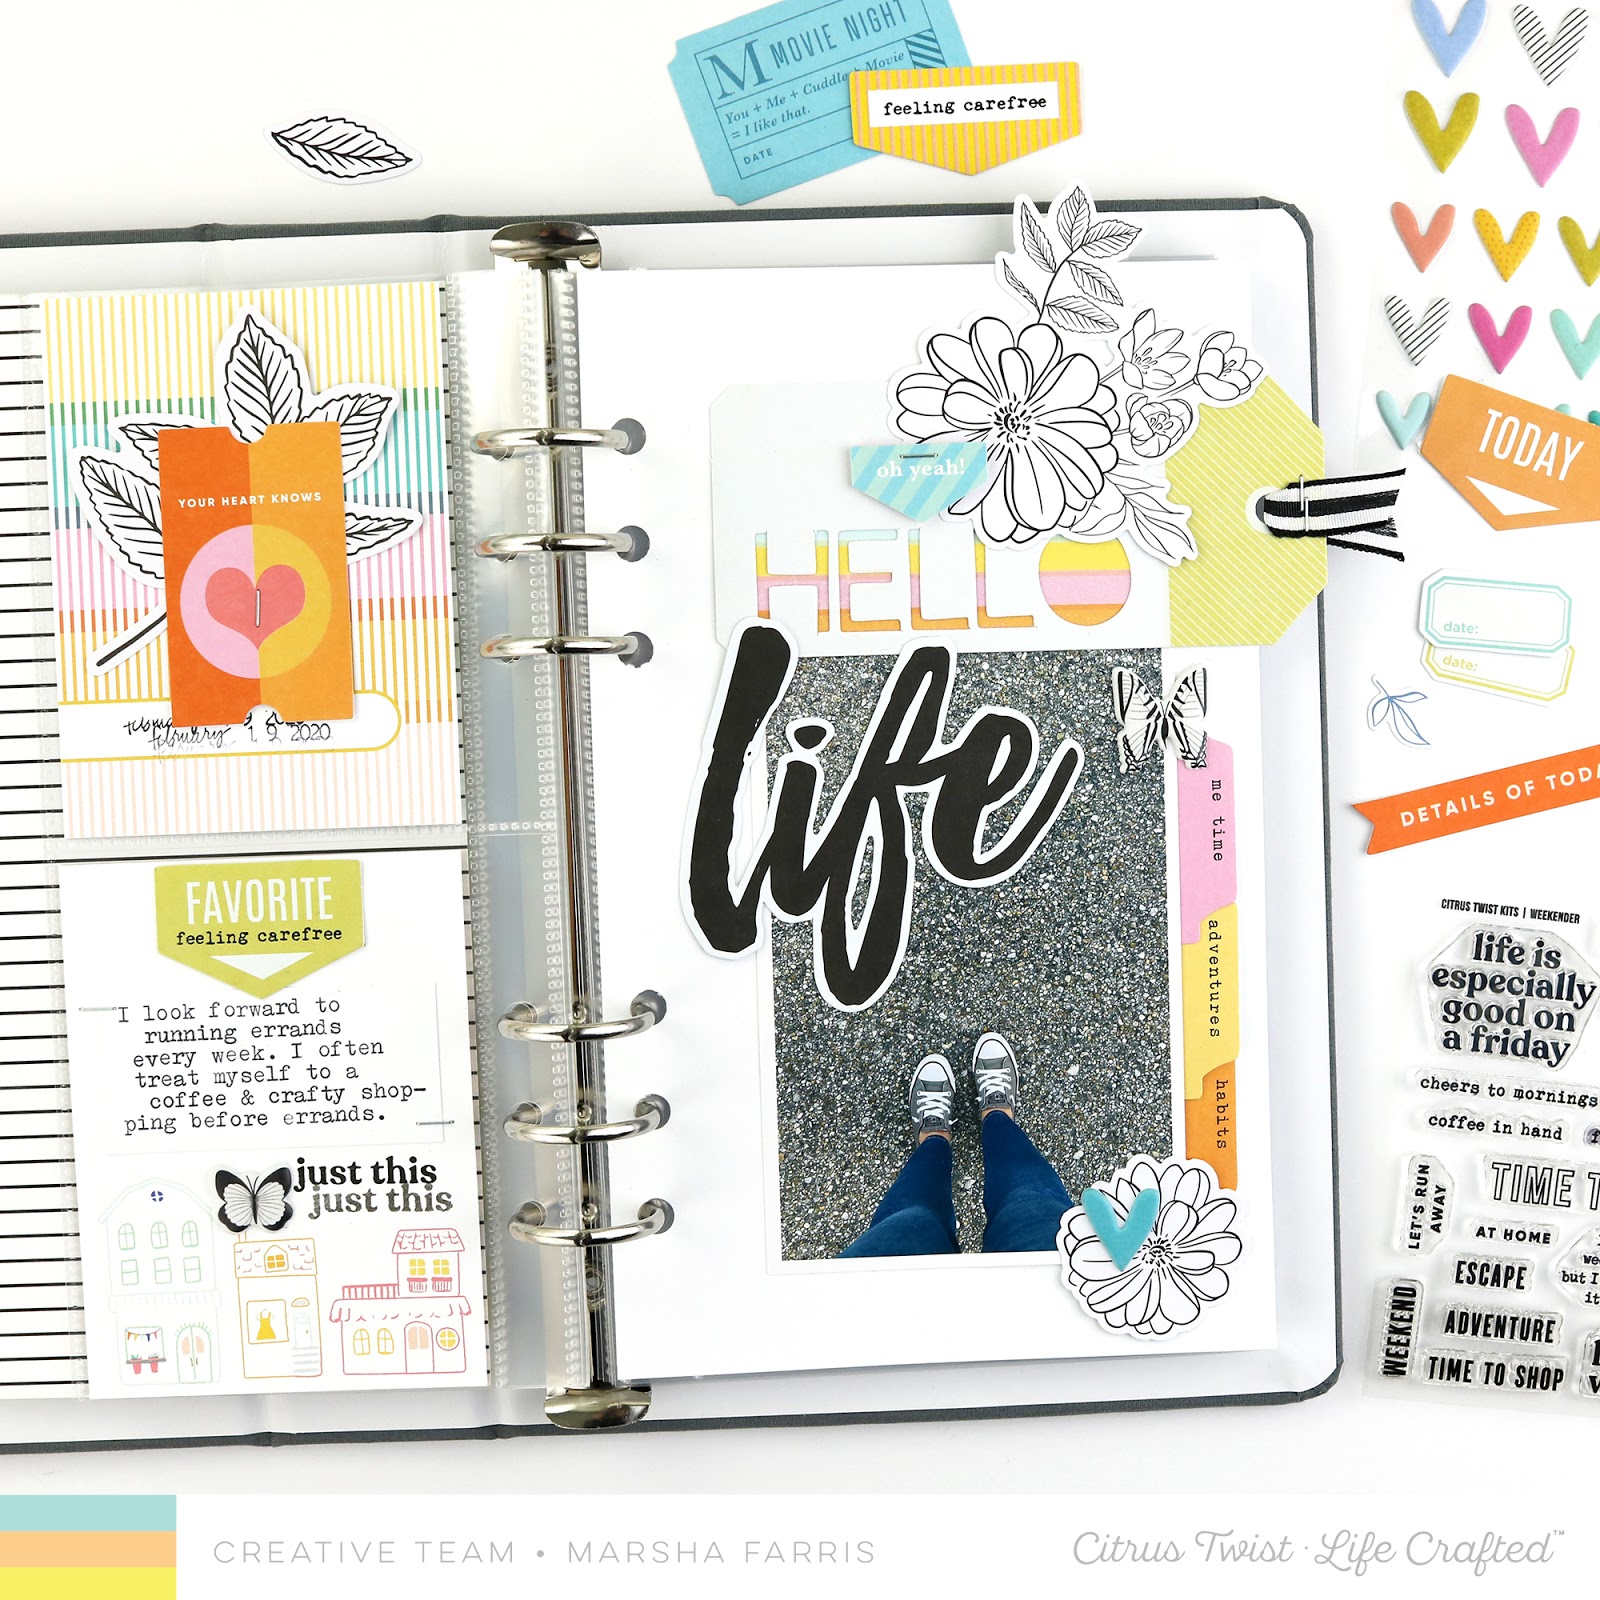
Hey friends!  I'm here today sharing a layout in my Life Crafted Album.  I used the gorgeous NEW March Life Crafted "Weekender" Kit and Scrapbooking Add-on Kit.  They are SO good this month!  I am also using my new Life Crafted Album in charcoal gray and it is beautiful! 

Here's a look at the layout I created:


To begin the spread, I trimmed a piece of white cardstock to 5" x 8.25" to fit as a full page in the album.  I printed a photo I took on a recent errand day and added it to the page.  I am determined to get more of these little everyday stories documented this year!  For the title, I backed a tag from The Stamp Market Miss Modern collection (from the Add-on kit) with a fun striped patterned paper from the LC kit.  I let the tag hang off of the edge of the page.  I love the bit of extra interest and fun this adds to the spread.  Next, I added the "Life" die cut over my photo to complete the title.  To embellish the page, I added some tab ephemera pieces from the LC kit and some beautiful black and white floral die cuts from the Pinkfresh Studio My Favorite Story collection, found in the Add-on kit.  I also added a heart and butterfly puffy sticker.


For the other side of the spread, I used a LC Page Protector #2 that has 2- 3x4 pockets. To begin, I trimmed one of the 4x6 LC journaling cards to 3x4 so that it would fit in the pocket.  I added another floral die cut and a ticket ephemera piece.  Then, I added a staple for extra texture and stamped the date using a roller date stamp.


For the other 3x4 pocket, I used a 3x4 journaling card from the LC kit.  I stamped a sentiment onto an ephemera label and added it to the top of the card.  I typed my journaling onto a piece of cardstock, trimmed it out, and attached it to the page using mini staples.  To finish off the card, I added a bit more stamping using the LC kit stamp and added a puffy butterfly sticker from the Add-on kit.


I've enjoyed sharing my project with you today!  Be sure to stop by the CTK shop and check out the new March kits and stamps.  They are perfect for helping you document your stories in a beautiful way.

xo,

Friday, February 21, 2020

Happy Love Day | The Cut Shoppe

Hey friends!  I'm back again today sharing a layout in my traveler's notebook album.  I couldn't resist creating one more Valentine's Day project before the month was over!  I used the fun Love Rules cut file from The Cut Shoppe.

Here's a look at the layout:


Here's the cut file:


For my spread today, I am documenting a photo of my youngest son with his Valentine treat bags for school.  He loved making goodies for his friends and teachers!

To begin my layout, I printed out the cut file using white cardstock and backed it with a plaid patterned paper from my stash.  I love using the TN sized cut files, because they don't require much embellishment but look awesome on a page!  I stamped the word "happy" using a stamp set from Elle's Studio and black ink.  To complete the title, I used puffy letter stickers to spell out "day" and stamped the date using a roller date stamp.  To complete this page, I added a puffy heart sticker to the heart portion of the cut file.


For the other side of the layout, I used a grid paper as the base.  I added my photo and used a variety of ephemera pieces to create a grid on the page, overlapping the photo with some of them. 


Next, I added more stamping using two stamp sets from Elle's Studio.  To finish off the page, I added some staples and faux stitching to a couple of spots on the layout.


Thank you for stopping by today!  I hope I have inspired you to use one of the awesome Traveler's Notebook cut files from The Cut Shoppe on your next project!

xo,
Marsha


Wednesday, February 12, 2020

Be My Valentine | The Cut Shoppe

Hey friends!  I'm here today sharing another layout in my traveler's notebook.  I used the oh so fun Be My Valentine cut file from The Cut Shoppe.

Here's the layout I created:


Here's the Be My Valentine cut file:


For my project today, I used lots of January 2020 release products from Elle's Studio.  To begin the layout, I sized the cut file to fit in my traveler's notebook and cut it out on white cardstock.  I backed the words and heart with different patterned papers.  Next, I adhered the cut file to another patterned paper and added it to the traveler's notebook.  To embellish the page, I added some puffy heart stickers and a die cut heart.


For the other side of the layout, I layered a tag behind my photo.  I stamped a label and sentiment onto some patterned paper, trimmed it out, and added it to the top of the page.  I used some phrase stickers and a leatherette sticker to frame the photo.


I did a bit more stamping at the bottom of the page and added a puffy heart sticker.  To finish off the layout, I added a messy hand-drawn border around the edges of the spread.


Thank you for stopping by today!  Be sure to check out all of the fun new designs at The Cut Shoppe store.  I will see you again soon!

xo,
Marsha

Monday, February 10, 2020

February Reveal Traveler's Notebook Layout | Elle's Studio

Hey friends!  I'm here today sharing a traveler's notebook layout using the NEW February Kit and Extras that released today at Elle's Studio.


The release this month is amazing- full of bright colors and rainbows!  What could be better than that?

I had fun with the new Sunshine and Laughter Stamp and stamped a colorful border on the edge of the page using a variety of distress oxide inks.  I love how this turned out and have so many more ideas for using this set!  The new Noted Vol. 2 Stamp was perfect for adding lines for my journaling.  It's such a versatile set and will definitely be a staple in my crafty stash!  For the title, I used the You and Me Wood Veneer, a banner from the kit, and one of the Be Happy Stickers.  To added a bit more color to the page, I added a Puffy Rainbow Sticker.


For the other side of the layout, I used a rainbow patterned paper from the Love Is 6 x 8.5 inch Paper Stack as the background.  I did more stamping using the Sunshine and Laughter Stamp.  To embellish the layout, I used the Puffy Rainbow Stickers and the Simply Wonderful Wood Veneer Banners. 


I also used the Be Happy Stickers and the Teal Acetate Alphabet at the bottom of my photo for additional texture and interest.


I love how my TN layout turned out using these bright and fun goodies!  Be sure to stop by the Elle's Studio shop to check out the February 2020 Kit and Add-ons.


Thanks so much for stopping by today!  I will see you again soon!

xo,
Marsha

(affiliate links are used in this post) (thanks in advance for using my links!)

Saturday, February 1, 2020

Driving | Citrus Twist Kits


Hey friends!  I'm here with this week's 3-to-Inspire challenge for Citrus Twist Kits.  This is always one of my favorite challenges to host, and it's even more exciting today because the new kits for February just released!  To join in, be sure to use all three prompts on your project.

Here are this week's prompts:

1. Use ephemera or die cuts
2. Add a large title
3. Do some stamping

Here's my take on the challenge using the NEW February "Possibilities" Life Crafted kit and the Spencer Solid Alpha Stamp:


To begin my layout, I printed two traveler's notebook ledger papers from this month's digital TN papers.  I chose to use a neutral background because I knew I wanted to add a large stamped title.  Using the Spencer Solid Alpha Stamp, I stamped the word "Driving" using blue distress oxide ink.  This is one of my favorite alpha stamp sets- LOVE the bold look it provides!  I did a bit more stamping using black ink and the kit stamp.  Next, I layered a few ephemera pieces, also from the Possibilities kit.


I couldn't resist using the ephemera keys and banner from the kit in a small cluster at the top of the page.  They worked perfectly with this story documenting my son driving.


For the other side of the spread, I typed my journaling on the computer and printed it directly onto the ledger paper.  I trimmed the multi-pattern kit paper into three strips and adhered them to the edge of the page.  Next, I layered my photo over a journaling card and trimmed the top of it into a ticket shape, following the ticket print on the top of the card. To embellish, I stamped a few sentiments onto labels using the kit stamp and layered ephemera and chipboard circular pieces over the edges of the photo.  To complete the spread, I added some puffy heart stickers to a few areas on the layout.


I hope I have inspired you to create a page using this week's 3-to-Inspire prompts!  I will see you again soon!

xo,
Marsha

Friday, January 24, 2020

The Fun's Right Here | Citrus Twist Kits


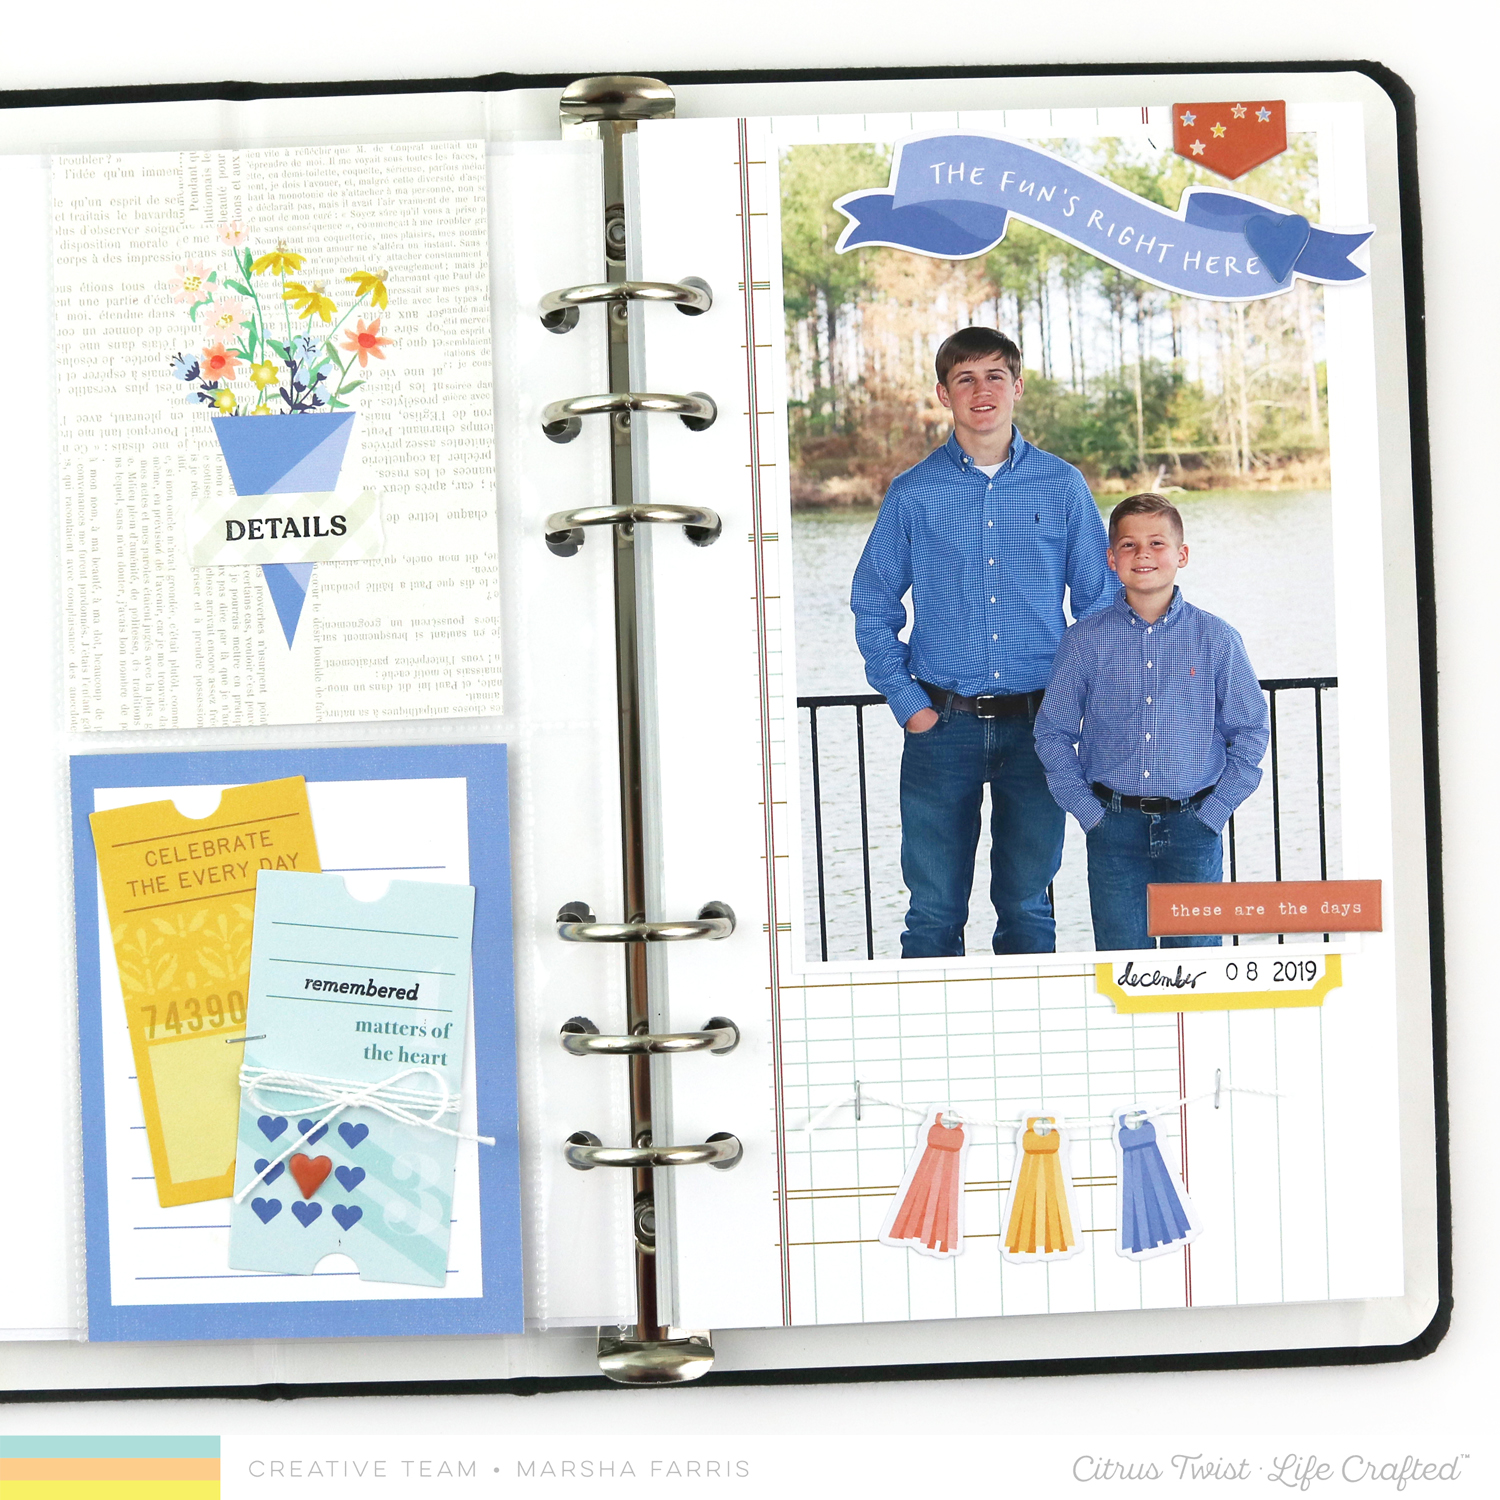
Hey friends!  I'm here today sharing a layout in my Life Crafted album.  I used the January "Fierce and Fabulous" kit and the Traveler's Notebook Stamp to create this spread.

Here's a look at my project:


This photo of my sons was taken last year at a family photo session, and I thought the colors in the kit this month worked perfectly with it.

To begin the spread, I resized and printed one of the digital 4x6 journaling cards to fit as a full page in the LC album.  I add the photo and stamped the date on a label from this month's printable cutaparts (free to subscribers).  I used an ephemera banner and some puffy stickers to embellish. 


Next, I punched holes in three of the tassels from the kit ephemera and added some twine and staples.  I love how this adds a little bit of whimsy to the page!


For the other side of the spread, I used a Life Crafted Page Protector that has 2- 3x4 pockets.  For the first pocket, I used my favorite journaling card from the kit.  I love the little floral bouquet!  I trimmed a small strip of patterned paper, tore the edges, and stamped the word "details" using the Traveler's Notebook Stamp. 


For the other pocket, I used another journaling card from the kit.  I added some ephemera tickets, wrapping a bit of twine around one of them.  I also added some stamping using black ink and the TN Stamp Set.  I adhered the tickets to the page and added a staple and a heart puffy sticker.


Thank you for joining me today!  I hope this inspires you to add some pages to your Life Crafted album using this month's "Fierce and Fabulous" kit.

xo,
Marsha

Tuesday, January 21, 2020

All the Feels | The Cut Shoppe

Hey friends!  I'm here again today sharing a layout in my traveler's notebook.  I used the Working Title cut file from The Cut Shoppe.

Here's a look at the spread:


For my project today, I wanted to do a non-traditional Valentine-themed layout about two of my favorite things- coffee and coffee mugs.  I began by cutting out the cut file using white cardstock.  I backed the heart portion with a black and white grid paper.  I chose a patterned paper from my stash to use as the background for the left side of the spread.  Using my sewing machine, I did some messing stitching around the edges of the paper.  I love how this adds texture and interest to the spread!  Next, I adhered the cut file to the page and added a heart ephemera piece, attaching it with staples.


For the other side of the layout, I printed my photo and backed it with a black and white patterned paper.  I used a tag and some ephemera pieces to embellish around the photo.


I printed my journaling on the computer and added it to the page.  To finish off the spread, I added a stamped sentiment and some more machine stitching.


Thanks so much for joining me today!  Make sure you stop by The Cut Shoppe store and check out all of the fun cut files!

xo,
Marsha


Friday, January 17, 2020

Love You Two | Elle's Studio

Hey friends!  I'm here today sharing another project I created for the Elle's Studio Design Team Gallery for this month.  I used the amazing January kit and add-ons to create this traveler's notebook album spread (album is from Citrus Twist Kits).

Here's a look at the layout:


To begin the page, I did some stamping on a piece of white cardstock using the Love You Lots Stamp and black and gray ink.  I always love the added interest stamping adds to a project!  Next, I trimmed one of the papers from the Love Is Paper Stack and layered it behind the photo, also adding a tag from the monthly kit.  To embellish, I used the Little Moments Leatherette Stickers, Wood Veneer Sweethearts, and I Adore You Stickers.  I also stamped one of the sentiments from the Love You Lots Stamp, trimmed it out, and stapled it below my photo.


For the other side of the spread, I began by trimming a paper from the Love Is Paper stack to fit in the album.  I trimmed a 4x6" tag from the monthly kit to about 3x4" and layered the XO Wood Veneer on top.  I used the La La Love You Puffy Stickers and the Valentine Multi Color Puffy Alphabet Stickers for the title.  To embellish the page, I used one of the Little Moments Leatherette Stickers, labels from the You Are Loved Die Cuts, and a heart sticker from the La La Love You Puffy Stickers.  To finish off the page, I stamped the date using the Mini Dated Extras Stamp.


Here's one more look at the completed spread:


I just LOVE how this layout turned out!  Be sure to stop by the Elle's Studio shop to check out the January 2020 Kit and Add-ons (affiliate link).  


Thank you so much for stopping by today!  I will see you again soon!

xo,
Marsha